
Hello, BeycanPress LLC has developed many WooComerce custom payment gateway plugins for our customers. In addition to this, we continue to develop a cryptocurrency payment gateway called CryptoPay, which is developed entirely for the WordPress ecosystem and supports WooCommerce payments internally.
In this article, we will discuss how you can create a custom payment gateway plugin for WooCommerce for developers.
What is WooCommerce Custom Payment Gateway?
There are already several options for taking payments with WooCommerce, such as Stripe, PayPal and CryptoPay. But sometimes you won’t find a WooCommerce integration for payment services that are specific to your country. In this case, you will need a WooCommerce custom payment gateway.
Step 1 – Create a plugin skeleton
You can develop custom payment gateways integrated into your theme or as a plugin. And usually custom payment gateways are always plugins.
WordPress plugins are very easy to build. As you will see in the following paragraph, you can make a WordPress plugin ready to write code just by creating a folder and a file.
Create a folder called “custom-gateway” in wp-content/plugins and create a PHP file called “index.php” or “custom-gateway.php” with the same name.
The important thing here is not the PHP file but the definitions made in the PHP file. If you make the definitions in “index.php”, this will be your main plugin file. If you do it in “custom-gateway.php” it will be this one.
The PHP file you define below will be your main plugin file.
<?php
/*
* Plugin Name: WooCommerce Custom Payment Gateway
* Plugin URI: https://beycanpress.com/how-to-create-woocommerce-custom-payment-gateway/
* Description: Take payments from custom payment solutions
* Author: BeycanPress LLC
* Author URI: https://beycanpress.com/
* Version: 1.0.0
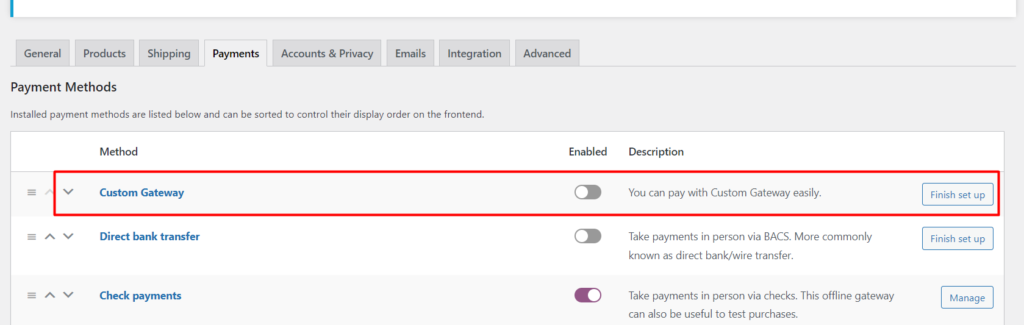
*/You will then see it in the plugins list and activate it from there.

Step 2 – Extended from WC_Payment_Gateway
Create a file called “gateway.php” and extend it from the “WC_Payment_Gateway” class. Then define the basic methods that should be in this class.
<?php

class Custom_Gateway extends WC_Payment_Gateway {

    private $api_key;

    private $testmode;

    public function __construct() {}

    public function init_form_fields() {}

    public function payment_fields() {}

    public function payment_scripts() {}

    public function validate_fields() {}

    public function process_payment( $order_id ) {}

    public function webhook() {}

}
The above structure is what a basic WooCommerce payment gateway should have. Now let’s look at what the individual methods are.
Then, we include it in the main plugin file as follows and add it to the gateway list with the woocommerce hook.
<?php
/*
 * Plugin Name: WooCommerce Custom Payment Gateway
 * Plugin URI: https://beycanpress.com/how-to-create-woocommerce-custom-payment-gateway/
 * Description: Take payments from custom payment solutions
 * Author: BeycanPress LLC
 * Author URI: https://beycanpress.com/
 * Version: 1.0.0
 */

// set plugin constants
define( 'CUSTOM_GATEWAY_DIR', plugin_dir_path( __FILE__ ) );
define( 'CUSTOM_GATEWAY_URL', plugin_dir_url( __FILE__ ) );

add_action( 'plugins_loaded', function() {
    require_once __DIR__ . '/gateway.php';
    add_filter( 'woocommerce_payment_gateways', function ( $gateways ) {
        $gateways[] = 'Custom_Gateway';
        return $gateways;
    });
});
Once you have done this, complete the first two methods mentioned below.
Step 2 – Methods: __construct()
In this method, we write codes related to the definitions, properties and settings of the gateway, the codes are explained with comment lines.
public function __construct() {
$this->id = 'custom_gateway'; // The payment gateway id
$this->icon = ''; // The payment gateway icon image URL
$this->has_fields = true; // If you need a custom credit card form
$this->method_title = 'Custom Gateway';
$this->method_description = 'You can pay with Custom Gateway easily.'; // Will be displayed on the gateway list in checkout
// Gateways can support subscriptions, refunds, saved payment methods
$this->supports = array( 'products' );
// Init form fields
$this->init_form_fields();
// Get settings
$this->init_settings();
$this->title = $this->get_option( 'title' );
$this->enabled = $this->get_option( 'enabled' );
$this->description = $this->get_option( 'description' );
$this->testmode = (bool) $this->get_option( 'testmode' );
$this->api_key = $this->get_option( 'api_key' );
// This action hook for saves the settings
add_action( 'woocommerce_update_options_payment_gateways_' . $this->id, array( $this, 'process_admin_options' ) );
// Add action for load custom scripts
add_action( 'wp_enqueue_scripts', array( $this, 'payment_scripts' ) );
// If you needed a webhook, define the webhook action
// add_action( 'woocommerce_api_' . $this->id, array( $this, 'webhook' ) );
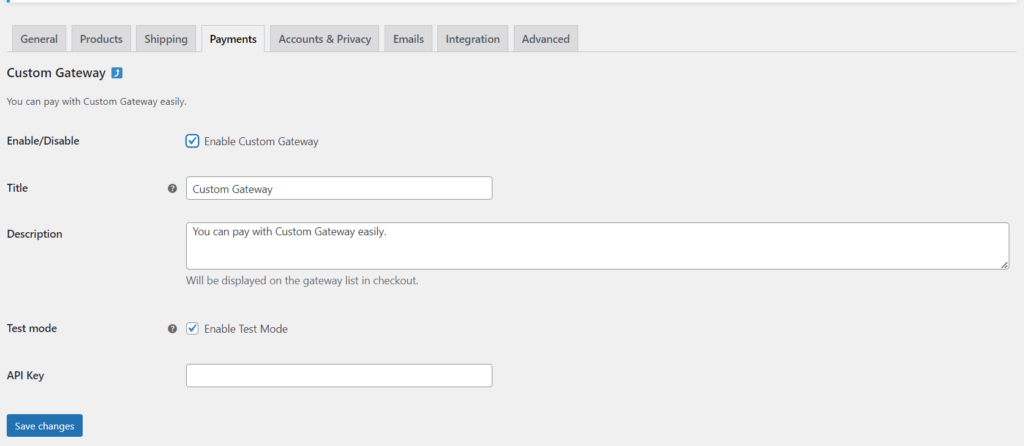
}Step 2 – Methods: init_form_fields()
In this method, we define the fields that will appear in the Gateway settings on the WooCommer / Payments page.
public function init_form_fields() {

    $this->form_fields = array(
        'enabled' => array(
            'title'       => 'Enable/Disable',
            'label'       => __( 'Enable Custom Gateway', 'text_domain' ),
            'type'        => 'checkbox',
            'description' => '',
            'default'     => 'no'
        ),
	    'title' => array(
            'title'       => 'Title',
            'type'        => 'text',
            'description' => __( 'Will be displayed on the gateway list in checkout.', 'text_domain' ),
            'default'     => __( 'Custom Gateway', 'text_domain' ),
            'desc_tip'    => true,
	    ),
	    'description' => array(
	        'title'       => 'Description',
            'type'        => 'textarea',
            'description' => __( 'Will be displayed on the gateway list in checkout.', 'text_domain' ),
            'default'     => __( 'You can pay with Custom Gateway easily.', 'text_domain' ),
	    ),
	    'testmode' => array(
            'title'       => 'Test mode',
            'label'       => 'Enable Test Mode',
            'type'        => 'checkbox',
            'description' => __( 'Run the gateway in test mode.', 'text_domain' ),
            'default'     => 'yes',
            'desc_tip'    => true,
	    ),
	    'api_key' => array(
            'title'       => 'API Key',
            'type'        => 'text'
	    ),
    );
}
It will look like this.
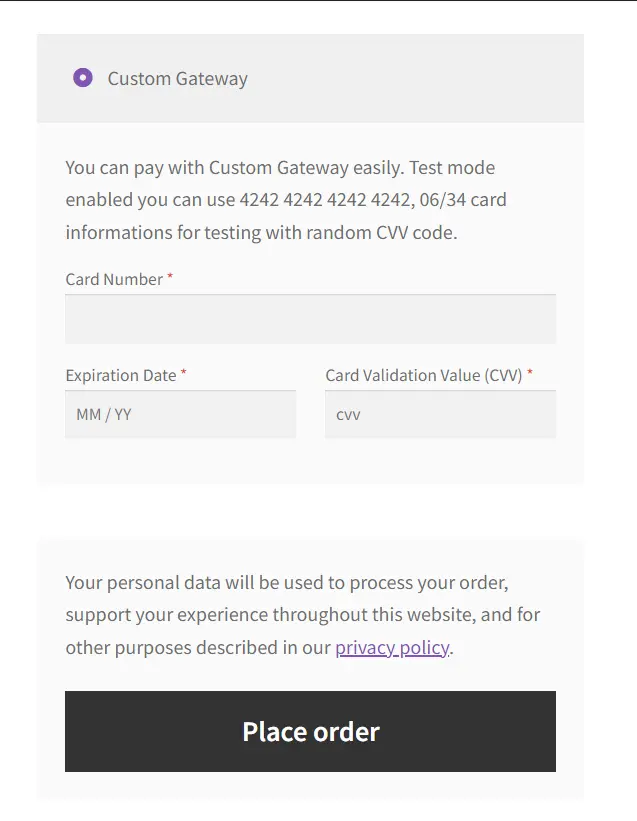
Step 2 – Methods: payment_fields()
In this method, we create the payment form that will appear in the checkout section.
public function payment_fields() {

    // if have a description
    if ( $this->description ) {
        // if in test mode, add custom information text
        if ( $this->testmode ) {
            $this->description .= __( ' Test mode enabled you can use 4242 4242 4242 4242, 06/34 card informations for testing with random CVV code.', 'text_domain' );
            $this->description  = trim( $this->description );
        }

        echo esc_html( $this->description );
    }

    // Add WooCommerce default cc form
    echo '<fieldset id="wc-' . esc_attr( $this->id ) . '-cc-form" class="wc-credit-card-form wc-payment-form" style="background:transparent;">';

    // credit cart form fields
    echo '<div class="form-row form-row-wide">
            <label>Card Number <span class="required">*</span></label>
            <input id="custom_gateway_card_no" type="text" autocomplete="off">
        </div>
        <div class="form-row form-row-first">
            <label>Expiration Date <span class="required">*</span></label>
            <input id="custom_gateway_exp_date" type="text" autocomplete="off" placeholder="MM / YY">
        </div>
        <div class="form-row form-row-last">
            <label>Card Validation Value (CVV) <span class="required">*</span></label>
            <input id="custom_gateway_cvv" type="password" autocomplete="off" placeholder="cvv">
        </div>
    <div class="clear"></div>';

    do_action( 'woocommerce_credit_card_form_end', $this->id );

    echo '<div class="clear"></div></fieldset>';
}
It will look like this
Step 2 – Methods: payment_scripts()
Here we will ensure that the JavaScript file we create is loaded on the checkout page.
public function payment_scripts() {
    // we no need any scripts for this gateway
}
We will not write any js code in this gateway example, but you can review the wp_enqueue_script() methods to load js codes.
Step 2 – Methods: validate_fields()
In this method, we validate the data sent from the checkout form that needs to be validated.
 public function validate_fields() {

    if ( empty( $_POST[ 'custom_gateway_card_no' ] ) ) {
        wc_add_notice( 'Card number is required!', 'error' );
        return false;
    }

    if ( empty( $_POST[ 'custom_gateway_exp_date' ] ) ) {
        wc_add_notice( 'Expiration date is required!', 'error' );
        return false;
    }

    if ( empty( $_POST[ 'custom_gateway_cvv' ] ) ) {
        wc_add_notice( 'CVV is required!', 'error' );
        return false;
    }

    return true;

}
Step 2 – Methods: process_payment()
In this method, we will be carrying out the actual payment process. This method sends us the $order_id parameter. First, we will create an order object with this id. I will be indicating all subsequent processes with comment lines.
public function process_payment( $order_id ) {

    // first create order object
    $order = wc_get_order( $order_id );

    /*
        * Set the parameters required by your payment service providers here
        */
    $args = array();

    /*
        * Send the request to the API URL given to you by your payment provider.
        */
    $response = wp_remote_post( 'PAYMENT_PROVIDER_API', $args );

    // Check the response status returned from your payment provider's API. (This may vary according to your provider's API rules)
    if ( 200 === wp_remote_retrieve_response_code( $response ) ) {

        // get the response body
        $body = json_decode( wp_remote_retrieve_body( $response ), true );

        // Check the response parameters returned from your payment provider's API. (This may vary according to your provider's API rules)
        if ( true === $body[ 'response' ][ 'status' ] ) {

            // Run the payment completed method on the order object to trigger the payment status and other codes that will run in this process.
            $order->payment_complete();

            // add note for order
            $order->add_order_note( __( 'Payment paid with Custom Gateway', 'text_domain' ), true );

            // remove cart
            WC()->cart->empty_cart();

            // redirect thank you page
            return array(
                'result' => 'success',
                'redirect' => $order->get_checkout_order_received_url(),
            );

        } else {
            wc_add_notice( __( 'Declined by your payment provider!' , 'text_domain' ), 'error' );
            return;
        }

    } else {
        wc_add_notice( __( 'An unexpected error occurred during the checkout process!' , 'text_domain' ), 'error' );
        return;
    }
}
Step 2 – Methods: webhook()
In this method, we wrote code assuming that the payment is completed during the transaction, so we did not use webhook, otherwise you can use the example below.
Activate the webhook action we specified in __constructer and the webhook URL will be as follows.
https://beycanpress.com/wc-api/custom_gatewaypublic function webhook() {
$order = wc_get_order( $_GET[ 'id' ] );
$order->payment_complete();
}If you need more help with this, please feel free to ask us for help in the comments.
You can also use the links below to purchase and learn more about CryptoPay, which we have developed and continue to develop for the WordPress ecosystem.
Review the CryptoPay: https://beycanpress.com/cryptopay/


